This post is a little different to my usual content, but I adore Pinterest and I wanted to share this for all of my fellow business owners out there (or just those of you who want to improve your personal profile).
Pinterest has grown my community more in the past 6 months than 4 years on social media has, and these are the basic steps I followed when I first got started. I am not an expert, but I have done a lot of research and got amazing growth from following these steps.
Step 1. Research your keywords
Before you start anything with Pinterest, knowing your keywords is so important (and not just for Pinterest, this can help with all your business).
A really easy trick to find your keywords is just type what you do in the bar and see what comes up underneath.
So for me “cross stitch kit” is the main keyword. Then “cross stitch kit counted” is a sub-keyword along with all the others on that list (I do about 10 subs for each main. Or most people will call these long and short tail keywords).
You can then click on the sub word and see if anything else comes up. If it does your main keyword might be too broad. For example, if I type just “cross stitch” I can keep clicking the sub-words at the top for a while and it just gets overwhelming with all the words.
So keep your main keyword broad enough to include some subs, but not so broad that’s there are hundreds of sub-words.
You may want to use a spreadsheet here.
Step 2 – setting up your profile
Get a business account
If you are a business make sure you have a business account (you have one if you have and analytics and ads tab on your homepage). As I already have a business one I can’t remember exactly, but to convert you’re personal you go to settings (top right corner of your profile page), edit settings and scroll to the bottom where it says convert to business.
You don’t have to convert your personal one, you can start from scratch and have 2 profiles. But I did this with twitter and my personal feed just died off. It’s hard to go between 2 profiles, so I just recommend sticking with one. You can still pin all the personal things without it affecting your business stuff by setting personal boards to secret.
If you are using Pinterest for personal use, but just want to curate it a little more then stick with a personal one. As I’ve just said, it’s easy to convert later on.
Change your name
You used to be able to have quite a long name, so I have Hannah Hand Makes | How to Cross Stitch + DIY Kits, but in the last month or so Pinterest changed it so you can only have 30 characters.
If you can, try and squeeze at least 1 of your keywords into your name. I haven’t changed mine yet because at the minute they’re not making you cut down your name if it was long before, but if I had to change it I would probably have Hannah Hand Makes | Cross Stitch.
In your bio bit, again try and squeeze a keyword or 2 in (naturally).
Change your profile photo
I know most people will tell you to have your logo as your photo on everything, but I highly recommend trying a photo of yourself/a head shot.
If you just sell products and keep your personal life completely separate then a logo might be better for you.
And if you really don’t want to have a head shot then your logo is fine, but maybe think about changing it in the future.
If you have your own website:
-
Verify your site. This is just a bit of code you have to paste into
your site. Pinterest is good at explaining how to do it for different
platforms. This is the link – https://help.pinterest.com/en-gb/business/article/claim-your-website
-
Then set up rich pins. These are really important if you’re pinning
blog article and products because it shows the price of the product on
the pin and whether it’s in stock.This is the link to set them up – https://business.pinterest.com/en/rich-pins
For everyone:
Now you can claim your other places such as you Instagram, Facebook, Google+, Etsy and YouTube if you have a channel. This is really easy to do; just head over to your profile, settings, edit settings and scroll down a bit.
Step 3. set up your boards
Everyone will share different advice about boards, so this might require a bit of testing.
To start let me say that it’s very rare that someone will click on your profile and look at every single board you have, but this can happen sometimes.
Boards are mainly to help tell Pinterest what your profile is all about.
Most people will say to only create boards that you have a product or content around so you’re not filling a board with just someone else’s content and nothing of your own.
This is good advice, but I don’t follow it.
And I feel there are 2 exceptions here for everyone – food and quotes. So many people go to Pinterest for recipes and quotes that I think it’s safe that some (if not all) of your audience won’t mind seeing some pins like this, but if you are keeping these boards public remember not to spam them with a load of pins that might turn your followers off. If you think you will pin to them a lot, keep them secret.
I have a few boards that I don’t create content around, such as a knitting board. Do I sell knitting products or blog about knitting? No. Do a lot of my community knit? Yes. So I know they will appreciate me curating good knitting content even though it’s not something I create content about.
The main thing to remember when you’re creating boards is keep them on topic(ish) and not very broad; keep them specific so then you can create more boards.
An example of some of mine are Christmas Cross Stitch, Valentine’s Day Cross Stitch, How to Cross Stitch, DIY Crafts for Kids/Adults etc.
Then I do have broader ones for things I’m not pinning as often for example Hand Embroidery, Other Cross Stitch Favourites (ones that don’t fit into a specific category), Quotes.
When you are naming these boards, try and pop some keywords in. In fact, some of your keywords might be good board ideas.
Make sure you write a description for each board too; this helps Pinterest know what it’s about because boards can show up in search sometimes.
1 board you need to have if you are a business is 1 with all your products/content in. Some people will call this a “best of” board.
I have 2 actually. 1 is called “Hannah Hand Makes | Cross Stitch Kits + Patterns” and the other is called “Hannah Hand Makes | Blog + Podcast”. This is a good place to send people to look through all of your content easily.
You can reorder your boards in your profile settings. Change to drag and drop and keep your product/content board at the top and topic-specific and season-specific ones under it.
A little word on board covers. When I first started with Pinterest I made board covers for all my boards. But then I gave up and now my boards look a mess on my profile with some covered and some not. If you want to do them you can, but I don’t think they’re totally necessary. You can just use an on-brand pin that’s already in the board as you cover.
Step 4. making Pinterest images
OK, the biggie…
First of all, your pin images should be horizontal in a 2:3 ratio. I have tested different sizes and my 2:3 ratio ones do the best every time which makes sense because it is what Pinterest recommends.
So you want to make 2 images at least specifically for Pinterest for each product/blog post. I recommend making a 600×900 pixel one and a 1000×1500 one to start.
Photos and text make the best Pinterest image. Make your text BIG AND CLEAR (just like that). Most people will say to avoid script font in your image but I put a little bit in and still get good results.
Pinterest can read your text on your image so it tells them what it’s about and where to show it in the search.
Try and make the text the same as the title of the thing your linking to (which should be key-worded).
Canvas is a good place to make pins and they export as a PNG which is what I recommend doing. They have templates as well. (I use InDesign, but that’s just because I pay for it anyway).
A note here though as recommended from my friend Daisy at Inspire Create Do and something I had not thought of. If you have a blog post and are putting the Pinterest image on the blog post PNG will probably slow your page speed down, so you may want to use a JPG instead. There are ways to pin without putting the image directly on your site though which I discuss below.
As well as the text you need a photo on your image, obviously related to the thing your pinning about. I tend to stick to one image, but also playing around with collage pins at the minute.
Or you can just have a plain coloured background and big bold text.
I also pop my website on the bottom of the pin and something a little extra bubble of like “plus download a free pattern” etc.
Make your colours of text on-brand then once you have made your 2 images you can make test ones too. So for me, I change the font colour from on-brand to something totally different. Pinks and reds do well on Pinterest. You don’t have to do this when you’re getting started; just make the 2 if it’s overwhelming you a little.
I use a template that I set up myself so I can make new images pretty quick. They’re not amazing images though. You don’t need to be a graphic designer to get good results.
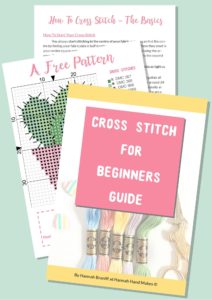
This is an example of one of my best performing pins.

Step 5. start pinning!
You can pin a photo straight from your site to Pinterest, but you can also upload photos to Pinterest. The longer ones are ones you can upload to Pinterest. When you upload it, you need to give it a title and description (title doesn’t matter too much if you have rich pins set up) and link it to where you want it to go when someone clicks it (so to a product or blog post)
Your description should include those keywords and let Pinterest and your reader know what the pin is about and what appears when they click it.
You can also add some hashtags. The recommended amount at the minute is 2-3 so I usually do 2 relevant ones such as #diycrafts and #crossstitch, but then I also do #hannahhandmakes so if someone clicks the hashtag they will see all of the pins with that hashtag on.
Then you choose a board. The first board you should pin to should be the most relevant board (not your best of). So if I was pinning “How to Start Your Sross Stitch” I would pin it first to my “How to Cross Stitch Board”.
Then after a week or so you can pin it again to your best of board. Don’t repin/save the one that’s in your relevant board though; upload it again as a fresh pin. You can schedule pins in the Pinterest app, but I highly recommend getting Tailwind. If you use this link you get one month free and I will get one month free as well.
Tailwind is a scheduling tool for Pinterest, but it’s amazing and you can join tribes to help get your pins seen and you can even do stuff with Instagram on there (but I haven’t got round to checking that out properly yet).
The best thing about tailwind is that you only need to write your description for your pin once then you can schedule it to different boards, but tailwind makes it a fresh pin every time. OK, I should probably talk about the fresh pin thing. Pinterest loves new/fresh content on their site and will favour this stuff. Pinterest doesn’t like it if you re-pin/save (the word “re-pin” is being replaced with “save”, but I still say re-pin) your own pin across your own boards. They want you to pin something then all your followers and their users to re-pin/save it for you.
There is so so much more I could dive into about Pinterest, but it can all get a little overwhelming so hopefully this will just give you the basics to get started.