In this post, I am sharing how to make a cross stitch clock using a design you have already stitched or the design I use in the tutorial.

I have wanted to make a clock from a cross stitch piece for a long time, but l wasn’t sure how well it would work. In fact, the first clock mechanism I used sat untouched for 2 years before I finally decided it was time to try this.
The great thing about this tutorial is how versatile it is. Once you have those outer numbers you can stitch anything you want in the middle! I opted for the little reindeer head and I love how the antlers wrap around the clock hands at 12 o clock.
I also have a bunny pattern that would work well in the middle because of his big ears which will look similar to the reindeer and look great in my daughter’s room (a project for the future for sure, I wonder if you can get pink clock hands…?)
Anyway, back to this project and how you can change the colours to match your decor and swap the hoop from Flexi to wooden. With wooden hoops you can paint them, put pom-pom trim on and even pop some glitter on there (plus they are easier to use than a Flexi hoop). But with a Flexi hoop hey can look a little better with this woodland vibe and they already have a hook on to hang your clock up once it is finished.
Cross Stitch Clock Tutorial
*This post contains affiliate links, but I only recommend products that I use myself. If you click on an affiliate link I may earn a commission but this is of no extra cost to you.
Le’s get into the how-to now and what you will need to make your very own cross stitch clock.
You will need:
- A design to stitch. You can grab the one I used here: PDF Cross Stitch Clock Pattern (it’s my own but I’m sure there are many more out there).
- Aida and threads to stitch with. Love Crafts have some great selections which you can shop here: Love Crafts Aida* and Love Crafts DMC threads*.
- A clock mechanism. This is the one I used and it worked well for the distance of the numbers from the center: Quartz Clock Movement Mechanism*
- An 8-inch hoop either Flexi or wooden. I recommend these: Love Crafts 8″ Flexi hoop* or 8″ Elbesee hoop from Love Crafts*
- Felt to back it
- Fabric scissors if you have them
- Embroidery scissors. You can browse some my shop here: Hannah Hand Makes supplies
- Interfacing. I used this one: Hemline Iron-On Interfacing*

Step 1. Stitch your design
Using the clock design that you have chosen, you need to stitch it onto your aida or evenweave. (If you need instructions on how to use evenweave I have a tutorial here).
I recommend using 14 count aida/28 count evenweave and cutting your fabric at least 10 x 10 inches.
And then stitch your design!
Step 2. Cut your felt out
Using the inner ring of your hoop draw around the outside of it on the felt. Then cut the circle out and keep it for later.


Step 3. Iron on the interfacing
Backing your design in interfacing will keep it a bit sturdier and give it a layer between the aida/evenweave and your clock back. To iron it:
- Cut out a piece of interfacing the same size as your fabric.
- Lay your design right side down on the ironing board, put the glue side of the interfacing down on top of it. Cover it with a towel or some cotton fabric.
- Put your iron on a silk setting (I personally turned the heat up a bit but always test with this setting first and turn it up as needed).
- Press the iron down on the fabric, but do not move it across the fabric. Just keep lifting and pressing.
- Check the interfacing is sticking (careful, it might be hot still) and if not you can turn your iron up a little until it does start to stick.

Once it has stuck and cooled down you might want to run the iron over the front of your design (I skipped this part and you can totally see an iron shape on my clock… oops).
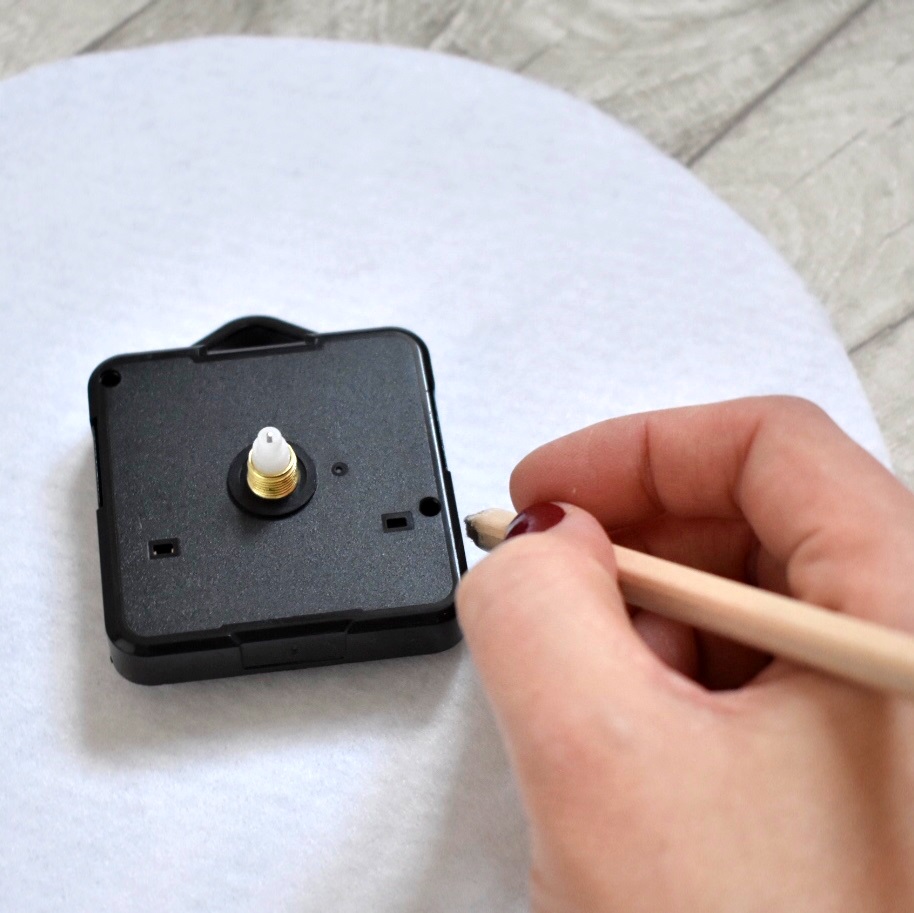
Step 4. Cut a hole for your mechanism
Time to snip a hole in your design now which is scary but needed!
Try and make it sit right in the middle (you cand find where the middle is on your cross stitch pattern) and big enough to fit the mechanism in.

Check the back of the clock fits in the hole before moving on.

Step 5. Put your design in the hoop
Line up your finished design on top of the inner ring and make a crease around it to ensure it’s in the right place. It’s important to get your fabric as center as you can so the clock points to the right numbers.

Then put the top ring on. This should be quite easy with a wooden hoop but Flexi hoops are sent to test our hoop patience and they may be a bit more of a struggle to get on. And your fabric might move and be off-center. Annnddd then you might finally get it on for it to just pop back off. But look! If I can do it then so can you.

Once it is on (it will go on) you need to pull your fabric taught in the hoop. If you have a wooden hoop, do this then tighten your screw as much as you can. With a Flexi hoop just keep pulling it all the way around.

Step 6. Back your hoop
You may notice from the photos that I did steps 6 and 7 the other way around. But this was not my brightest idea because trying to back a hoop that has clock hands on the front of it was not fun. Trust me.
But before you back your hoop you need to cut a hole in that felt circle we cut out before. Draw around the battery part of your clock mechanism and try and make sure this is in the center of your felt or as close as you can get. Then cut it out.

This will make sure you can change the time or the battery without unpicking all those blanket stitches you’re about to do.
Next, you need to snip off the corners of your aida and do a running stitch all around the outside, pulling the thread so it bunches together at the back Don’t worry if your interfacing comes off a bit, the hoop will keep it on the back .


Then you need to attach your felt using a glue gun or a blanket stitch. I have a video tutorial on how to do a running and blanket stitch to back your hoop here.

Step 7. Put the clock mechanism on
Now the fun part! You should have a hole in the felt at the back to put the battery part of your clock in and then you need to push it through the hole on your fabric.

Now attach the clock hands making sure to follow the instructions in your clock kit carefully. You need to make sure there is a gap between the hands so they can move properly.

And you are done! Pop a battery in, hang it up and smile every time you go to check the time knowing you made something timeless.
And don’t forget that PDF Cross Stitch Clock Pattern that you can use to make as many clocks as your heart desires (did anyone else just get an image of Hilda’s clock shop from Sabrina the Teenage Witch?)

If you want to come and show off what you are making then come and join my Facebook group Hannah’s Hand Makers where there are over 1000 makers from all around the world.
Pin for later

Extra Cross Stitch Tutorials:
- How to Make a Cross Stitch Banner
- How to Make a Cross Stitch Lampshade
- The 7 Things I Wish I Knew Before I Started Cross Stitching

I love the Cross Stitch with clock. It looks so beautiful. My wife and I have an old clock that we inherited when my dad passed but it doesn’t work. We were looking for ways to bring new life to it, but we may reach out to a clock repair service to see if they can fix it.